Waste Not
Last night I stopped at my mom’s house and she was telling me about how my great-grandma used to save everything. She said that it their time people never wasted, and reused everything imaginable. I am pretty much a pack rat and always try to find new uses for old things too, but she had a couple of cool ideas I never thought of.
One no-brainer that she mentioned my great-grandma did was save her bread bags. She would shake or rinse them out and reuse them as baggies. Really? We use baggies for everything, so why had I never thought of this? You could use them as a cheaper alternative on dog walks, or even to bundle or store the items you normally use a baggy for! So simple, yet so green and effective!
She also mentioned that they often saved the same bread bags for making rugs. I have seen these in my grandparent’s old house. Here is a picture. Visit her site to see instructions for crocheting the round version here: http://www.myrecycledbags.com/2008/09/27/recycled-round-plarn-rug/


I think these could be really fun and funky. Now I need to learn how to crochet!
Other things that my great-grandma saved were more common, and things that we already frequently save, but still great reminders nonetheless. Cool-whip containers, coffee cans, other plastic, cardboard, or metal containers. These can be reused in so many different ways in the home. You can even recover or paint them to match! One more thing that she saved was the little plastic eggs her pantyhose came in. I had to laugh. My mom said she had tons of them. Hmm… what would you use those for?
Especially in hard economic times, but always to be healthier for our planet, its great practice to reuse such commonplace items. What other ideas do you have?
Some Color In The Pocket Office
Over the weekend I made a few tiny but fun changes to the pocket office. First, I added some bright red paper to the blah sides of the drawer set under the desk. It looked as if it had just been stashed under there, but now it looks as if it was intended to be there. I also tried to eliminate some clutter. I took down the picture mobile, arranged some of the hanging photos on the inspiration wire, and changed the art a bit.
I had seen online where framing simple art in a blank CD case can be easy to swap and add a fun punch to your walls for little money. So, I hung three of these CD case frames with some strange art in them above the desk. The art was small, cluttered, and mismatched. I changed the art out to something more simple and in the color scheme. I then hung them vertically to contrast with the inspiration wire. I think this is starting to look much better than my original office a few months ago!

The colored paper on the drawers.

The CD case art I made.

Doesn't it look so much better!?

And, the other side of the office, so you can see the pretty matching boxes.
What do you think?
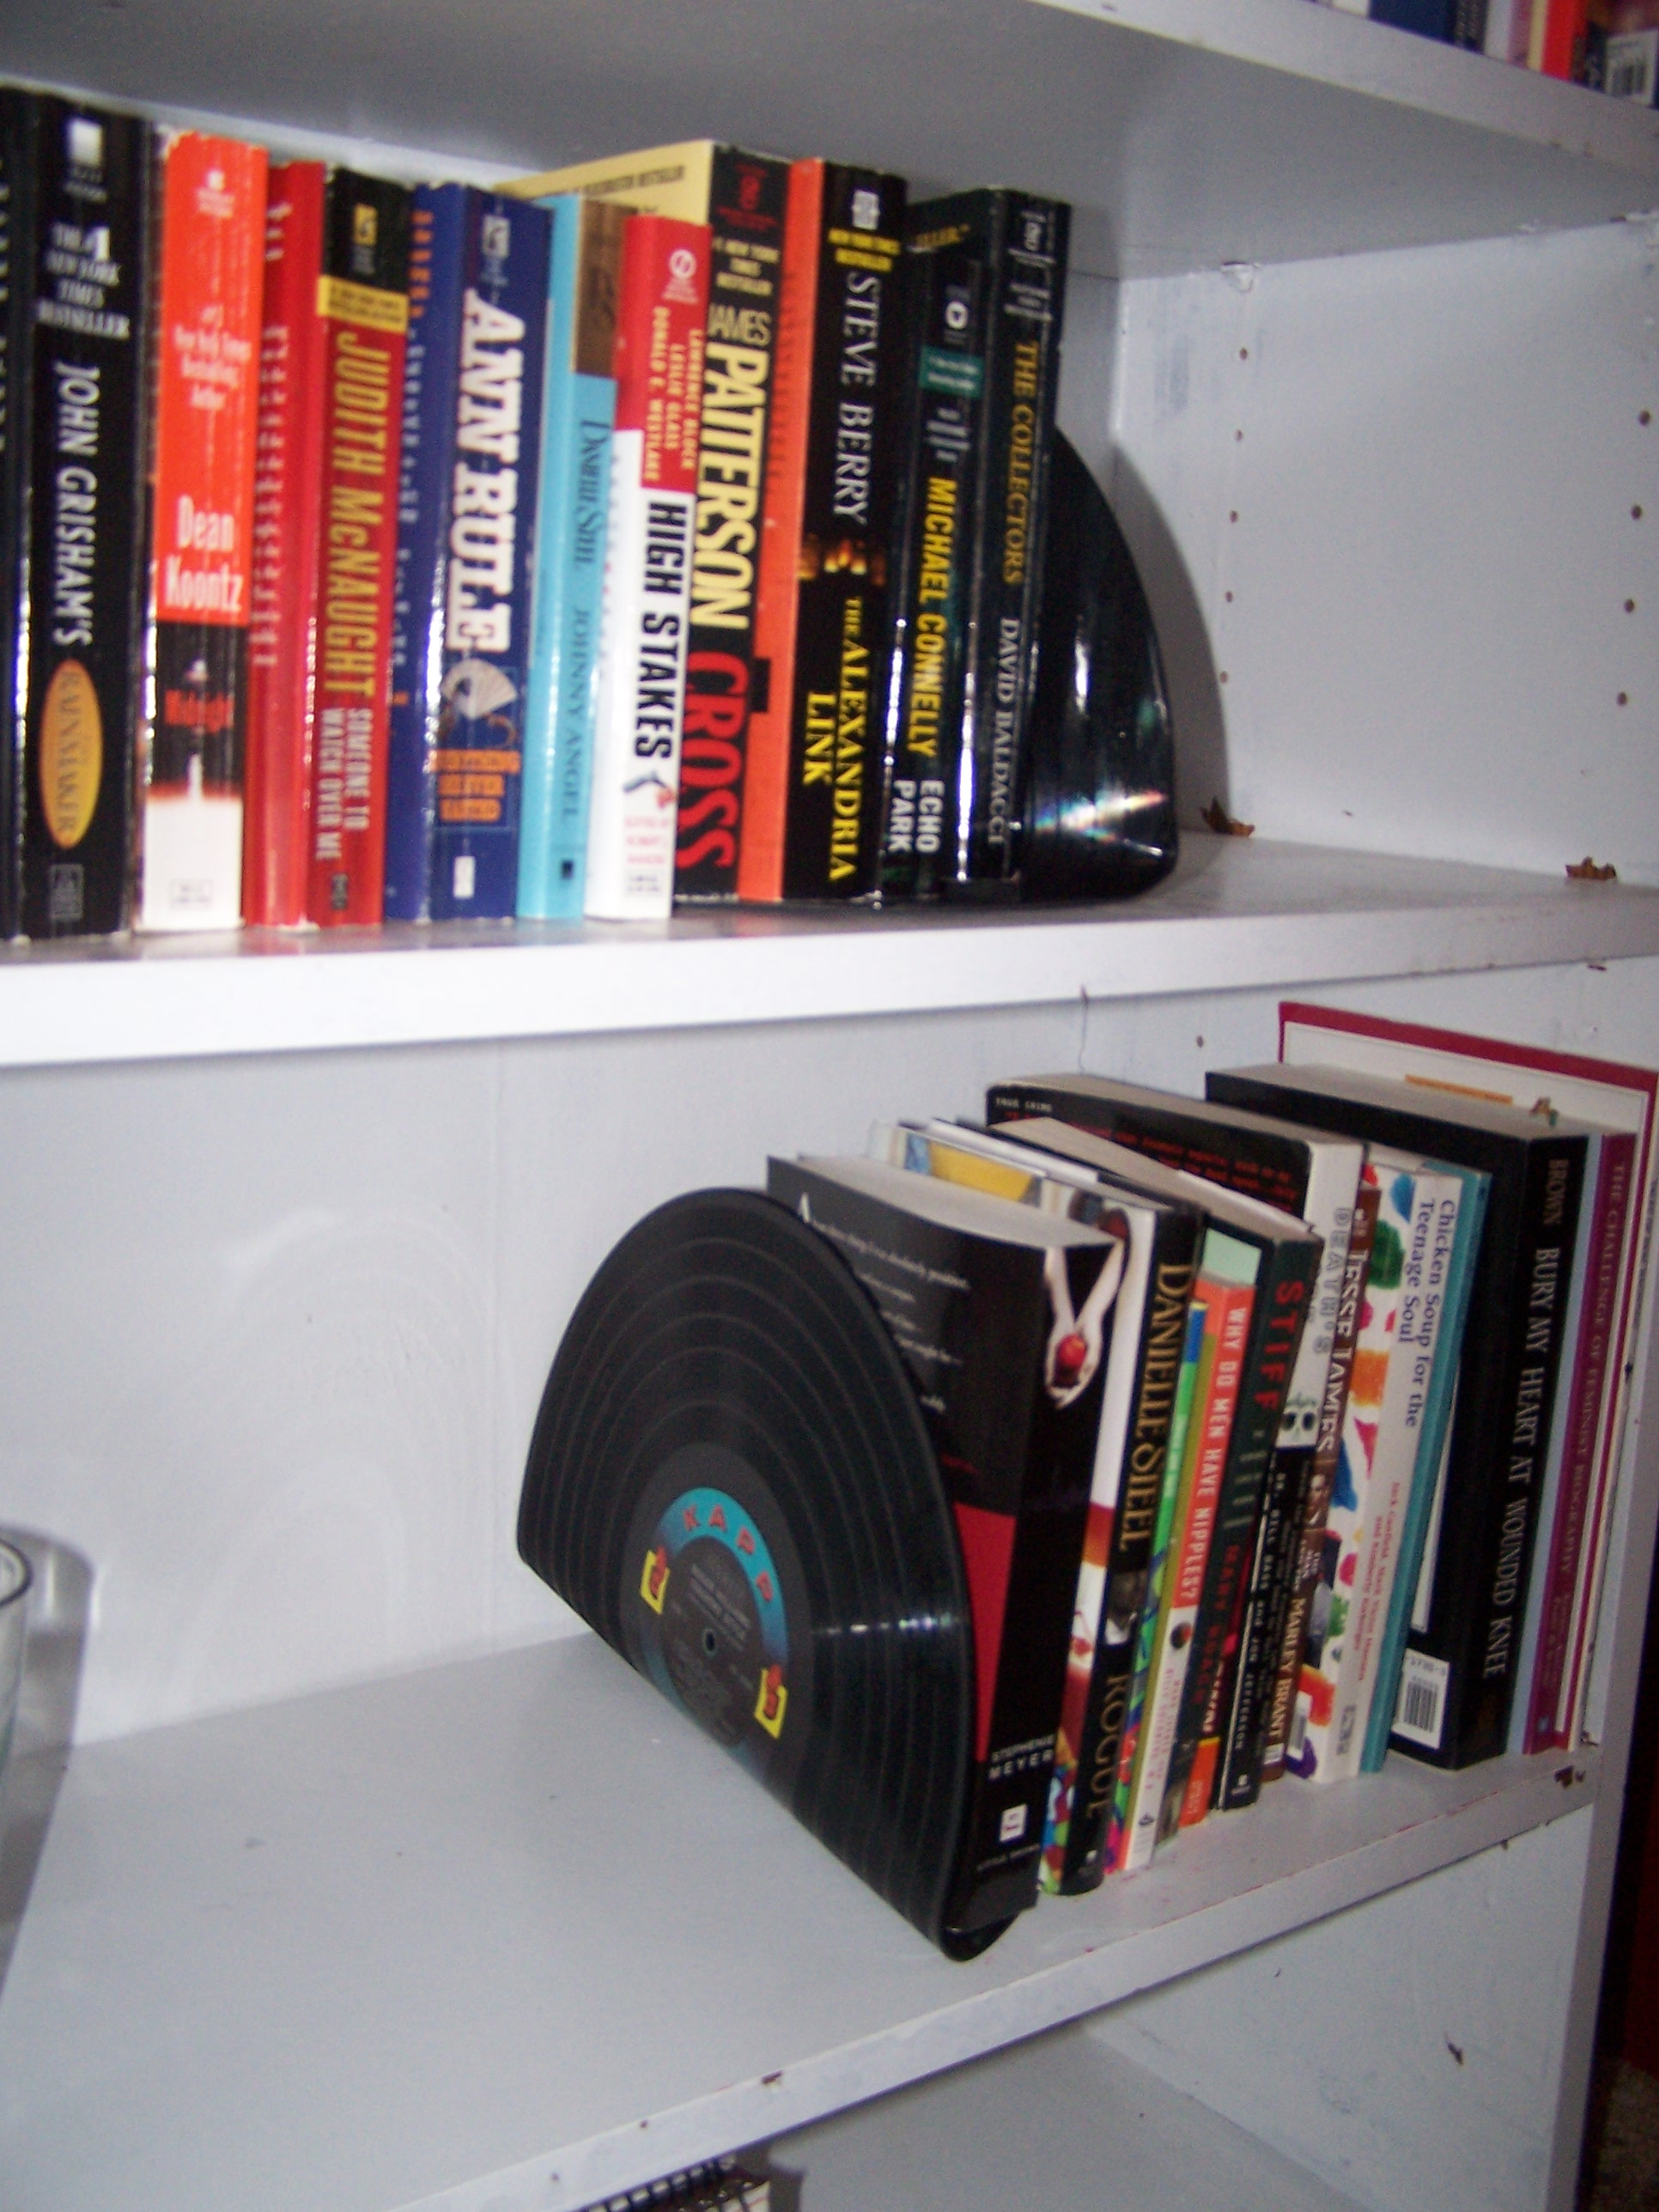
Bookend Project
I have said it before, but I love repurposing items. Especially in these times, finding new life for old items is the greenest option. Some things you hate to ruin by transforming them, but for the most part I believe that reusing old or obsolete items is a far better choice than letting them waste away in some one’s unloving basement, or worse yet, a landfill. Plus, repurposing is often much cheaper than buying new items, as well as healthier for the planet. So, when I get the chance to make a new addition to our home, and at the same time get a new project with old items, I jump on it!
In college I made bowls out of records as a dorm floor project. I still have mine in our office on the book shelf. The other day I saw a project online where book ends were being made out of old records, and decided that would be a perfect addition to the shelves, and even fit in with our music themed office.
I made a stop yesterday at the Salvation Army and picked up two records. They weren’t anything special, just old records in decent shape and with pretty labels. Last night we boiled some water and dumped it in the kitchen sink. The water softens the record and you use a utensil to bend it.
Overall the project was easy and turned out pretty cute!


Cooling off under a box.

Bench Project
When we first moved into our new house Tony and I bought a vintage vanity on Craigslist for $20 to go in our spare bedroom. The vanity is used to hold all of my “get ready in the morning stuff”. The vanity came with a little vanity bench. The problem was that the bench didn’t match the vanity. The bench was painted white and had obviously been recovered with some purple material. I had thought about painting the vanity a shabby white, but that wouldn’t solve the whole problem. The styles and sizes of the vanity and the bench didn’t even match. So, I put the bench up for sale on Craigslist, again. After a couple of weeks the bench still hadn’t sold. Well, another project for me!
I liked the chipped white paint of the bench, so I decided to keep it. I also decided that there were too many things, including another, smaller vintage vanity seat already in the spare bedroom. I thought that the front porch could use something, so that was to be the new home of the bench. We have a small, white ice cream table and two chairs on the porch, but nothing else so far. The white would be a perfect match. I have also had my eyes peeled for some of those vintage metal lawn chairs. I want two of them in red, or to paint red. That helped me make my choice for fabric. I chose a white material with a red coral pattern.
Last night I started ripping old fabric off the bench. Come to find out there was not only one layer of awful fabric, but three! Here’s the before photo:

The next layer. Even worse:

And the final dingy layer:

But, here’s what it looks like all spruced up:


I think its really cute now. I will show you pictures of what it looks like on the porch once I get the ice cream set repainted!
Mini Bar Update
We have had the old TV armoire we found on Craigslist home for a couple of weeks now. I haven’t posted about it because we are having a change of heart. We had wanted to strip the wood and stain it black. But, when we got the cabinet home we thought it was so gorgeous we couldn’t bear to do that! I thought that going black and adding some shiny handles and mirrors would add some Hollywood Regency to the cabinet, more suiting it to become a mini bar. I just don’t know if we can bring ourselves to touch the beautiful wood. We did add a stemware rack to the top and filled it with our lovely bar glasses and goods. It is really gorgeous in our dining room, and it has already served it’s purpose. We do still plan on adding another shelf in glass and also a pull out shelf for more mixing and pouring space.
What do you think? Should we restain the cabinet black or leave it as it is?


You can't see it here because there is no stemware in it, but there is a clear stemware rack on the right side.
We really do need your advice, opinions and ideas!!
New Old Shade
Its official. I am sick of our curtains. All of them. Every room. I knew they were bad from the day we moved in, but now I am at my breaking point. So, on my day off yesterday I did some work and started plunging into our curtain situation.
I thought I would start off small. There was no shade over the large window in our kitchen door. Our neighbors could see right in! I decided to take the old white roller shade from the dining room door (since it also has a curtain) and refinish it to go in the kitchen. I wanted to stick with the black and white theme. I used some swirly scrap-book stencils I had and a paint pen ($3 at Wal-Mart). I laid the stencils out where I liked them, traced, and colored in. Now, viola!


What a simple , inexpensive project with such great results! This weekend I plan to get some black material and sew a valance at the top, as well as simple black curtains to replace the strawberry ones in the kitchen window. Then on to the rest of the house…
P.S. Yes, there is a cute in the shade. The landlord has mis-cut part of the shade. I didn’t want to try out my new paint idea on a new shade and ruin it. We like it well enough that I will soon go through the time and effort to reproduce this on a new shade!
The Start Of A New Project
The other day I wrote about how we wanted to make a mini bar area in our home. I showed pictures of other people’s re-purposed bar areas that we loved. But, after much discussion we decided we liked the look of a closed cabinet for this kind of thing a little better. With all of my inspiration in hand, I set out to plan my own mini bar project. Yes, we found the perfect (we hope!) cabinet for the job! A Craigslist post led us to the Maple TV Cabinet.

I see much potential in the armoire! (We don’t actually pick it up until Thursday.) I plan on first painting it a high gloss black. The back inside of the cabinet with be lined with mirror and wine and stemware racks will be hung from the inside. The inside has one shelf, but we are guessing we will make a few new shelves from glass. I am going for a bit of Hollywood regency here. Overall, we think this beauty should have plenty of space for our entertainment needs!
We do have one small question, however. I think there needs to be a flat space large enough to mix the actual drinks incorporated into the cabinet somehow. I was wondering if the drawer could be used for that. It might be a bit too low to be comfortable, though. I was also wondering about making a sort of pull-out shelf inside the cabinet. Is this even possible? When I see the cabinet in person I will know if more space is necessary. Until then, does anyone have any ideas or suggestions?
We are very excited to get the project rolling, so stay tuned for updates!
Making A Mini Bar
Currently we hold all of our drink glasses, servers, shakers and wine and liqueurs in one of our kitchen cupboards. But, I have always wanted to do something different with these items. I would like to have some sort of mini bar in the kitchen or dining room. This would be such easy access for entertaining. Also, it would free up more cupboard space in the kitchen, which for us is at a premium!
I have recently seen a few photos of DIY bars and am in planning process for making one of our own.

This redone shelf unit was posted on Apartment Therapy. I think this is great inspiration for our project. A simple shelf unit like this would be easy to find and probably affordable. I really love the wine racks and glass holders. I also like the idea of lining the backs of cabinets with colorful ,fun paper. Here is another picture of a mini bar with beautiful paper:

http://www.apartmenttherapy.com/chicago/inspiration/inspiration-lined-cabinets-075583 . Originally from Homes and Gardens.
I also like the idea of using a bar cart or serving tray with a few bottles and glasses, but options like the cabinets in the pictures would give us much more space and probably be safer with pets, especially if there are doors.
I am very excited to get started on this project, and will keep you posted!
Cube Redo
I have had this little storage cube since I was a kid. When new, it had a unicorn and a rainbow on it. Recently I redid the look of the cube so that it could be used in our home. I forgot all about the cube project until yesterday. There was a question posed on Apartment Therapy about recommendations for redoing a similar cube. I thought that I would let you all know how I did the project, and although I do not have any before or durring pictures, I can show you how it turned out. Here was the process:
1. I started by covering the picture areas of the cube with white contact paper. I was lucky that the sides were the same width as the paper, but I did run short of paper at the top and had to piece two pieces together. For a bigger box this is what you would have to do. Not to worry, the seem barely shows once you get the paint on the paper. Just try to line them up as exactly as possible.
2. Once the paper was on, I used an Exact-O knife to cut the contact paper around any hardware or latches. This worked well and really didn’t cause any problems as long as you work slowly and patiently.
3. After the paper was laid and cut, I painted it. I picked a dark red, and simply used wall paint from the hardware store and applied with a regular brush. I recommend this, as it was easy and inexpensive. I personally wanted an antiqued look to go with the worn metal hardware, so I only applied one coat and left it a bit streaky. If you want a smooth, more flawless finish, I think two coats would do the trick just fine.
4. To add a personal touch I used a foam stamp. I found this stamp at the hardware store on sale for about 50 cents. While the paint was still wet I pressed the dry stamp into it in a pattern I liked. When you raise the stamp it takes some of the paint off, leaving a lighter area for the design. I used a circular design that went with the antiqued look.
Viola! Finished! It really was that simple. Now this cube serves as storage for blankets in our living room. And, this has stood up to some use and abuse and even relocating a few times. It has a few small scratches in it now, but that seems to add to it’s antiqued character. If you want yours to stay looking new try using a protective clear coat on top. Here’s what ours looks like:


Some foam stamps similar to mine can be find at http://www.makingmemories.com and other scrap-booking websites.

Have fun!
New Little Project
I love finding odds and ends to fix up, remodel, or work on that I can then add to our home. These little projetcs are fun for me and keep me busy. This new task is a stool from my grandmother. Its not new, not antique, not anything special really. I almost truned it down. But, she said that it opened up. That caught my interest. Then, she suggested that maybe I could keep some interesting photos in it. BINGO! I snatched it up in a hurry. I love a bit of unexpected, and her idea of putting snapshots in the stool was perfect. I plan to recover the top with some funky material. I’m not sure if I will paint it yet. Then I will add some old, random photos to the inside for company to explore. Cute! Any suggestions on print or paint? Let me know what you think!

So much potential...

Vintage photos tucked away in here would be perfect!
