Why I Love My Cricut
This is a sponsored post written by me on behalf of <a href=”Cricuthttps://lnk2.io/wjcWg2L”>Cricut</a>. All opinions are 100% mine.
I have had my Cricut Explore Air 2 for a few months now, and to say I’m in love is an understatement! I’ve always been a crafter, but this things really helps me step up my game! Here I am going to talk about the 5 things that I love about my Cricut!

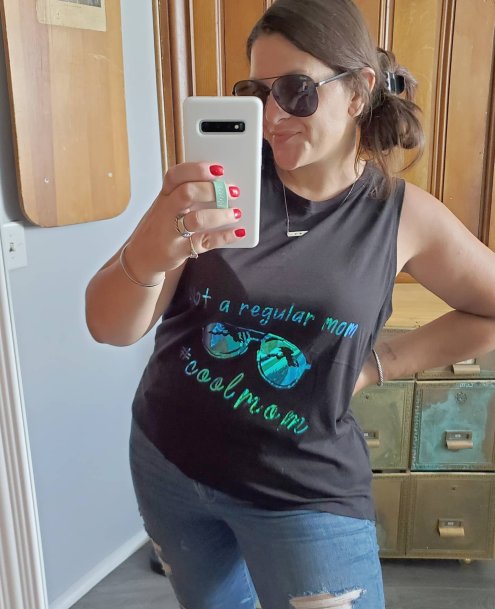
1. Its easy to use! I was truly shocked at how easy this machine is! Not going to lie, I was intimidated at first. I worried where to start and if I would be able to figure it all out. Yup. I was. Best place to start? Pick a project and jump in. They really mean it when they say their motto is “beginners luck every time.” I learn tricks and get braver each time I use my machine, but I definitely agree that picking a beginner level project and diving in head first is a great way to start and will prove to you how easy it is! Check out this shirt I made as one of my very first projects:
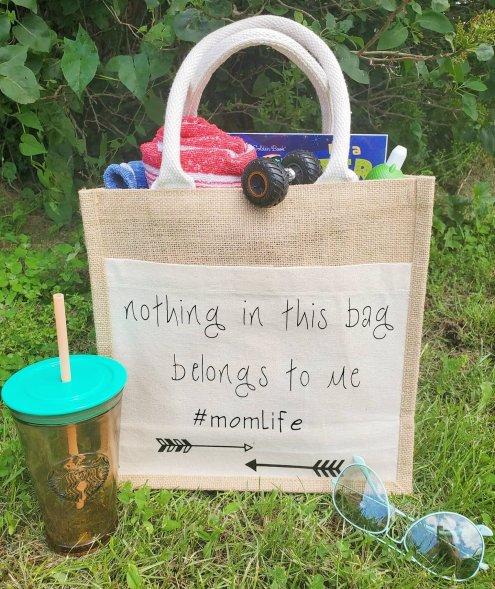
2. Support! That brings me to the second thing I love about my Cricut. Its like having a whole community of creators to support you. Have a question? Worried about where to begin or which type of project to do? They’ve got an answer! Not only does Cricut have a team you can email or chat with, but they have numerous pages where you can reach out to their pros or other crafters with tons of experience. They’ve all started somewhere and learned lots and are at the ready to make sure you love your machine and projects. I would know. I wasn’t sure how to customize the design I wanted to make myself for this bag, and the Facebook page group had almost immediate answers for me!
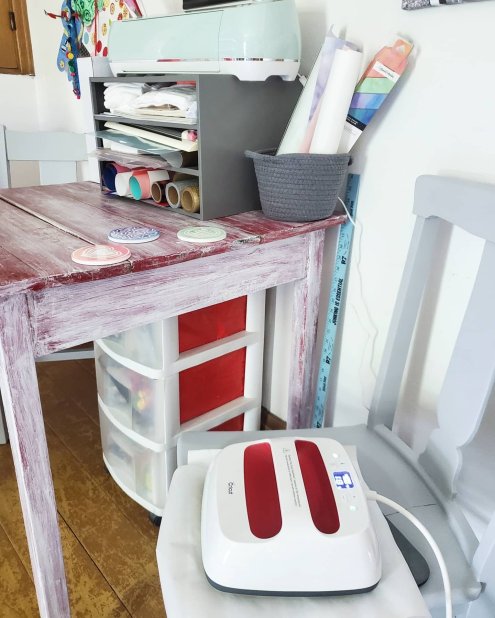
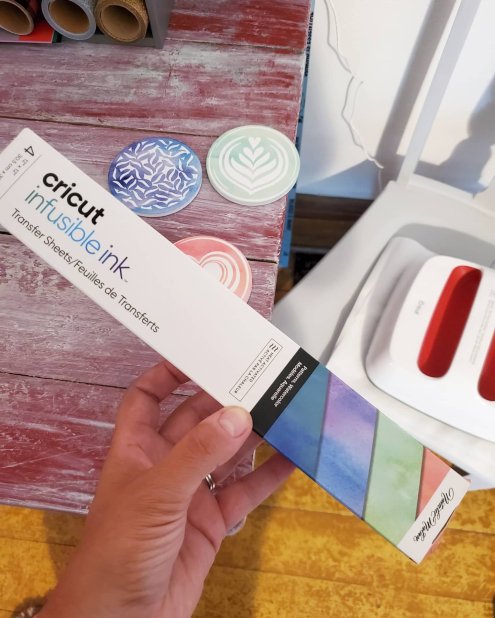
3. Ideas! This also leads me to another thing I love about Cricut, the ideas! I never worry about having a creative block. There’s no way. The ideas of projects to make are endless, for every single occasion you cak dream of. Really. You can find ideas galore on Pinterest, and Instagram, or Cricuts’s Facebook page. And my favorite place for inspiration? The Cricut emails! They send seasonal emails showing the new ideas and templates added to Design Space, their app for making. How did I know about the new infusible ink and coaster blanks to make these? One of their idea emails! Light bulb!

4. The options! Got a bright idea to make? You can! And Cricut can help you do it! The options they supply for you is endless. Or almost. Not only do they help with the ideas, but they make it easy to find all of the supplies you need to make visions come to fruition. They have coasters, bags, shirts, materials, pens, markers, vinyls, decals, iron ons, and the widest variety of patterns in their supplies you could imagine! Sparkles, holographics, leopard, wood grain…their possibilities are never ending! Not to mention, cricut has other machines like the EasyPress, and tools like mats, cutters, Nd weeders, to make all of the options come to life!

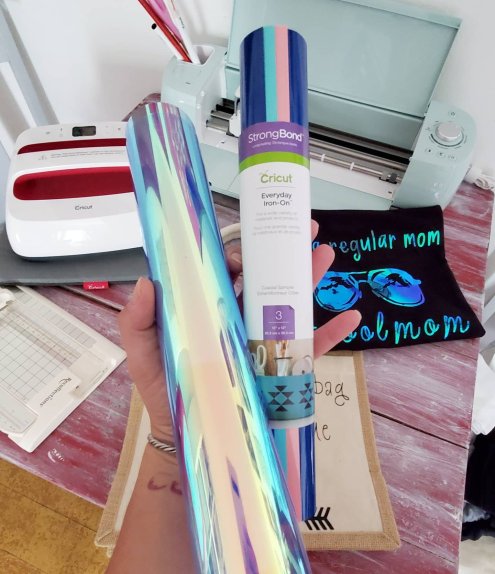
5. Capabilities! This machine not only cuts paper and vinyls. I was shocked to learn what all it really can do. Like blown away. It can cut leather, poster board, felt, fabric and even wood. But it doesn’t just cut, it can score. And it can draw! Yup! Shocked?! Me too. You can insert pens and markers into the blade holder and it can draw or write, making handmade cards, letters, signs… mind blown.
The capabilities combined with the Cricut options alone shows you that the possibilities are truly endless. I cannot wait to do another project every time I finish one! And now all of my gifts will be one of a kind made by yours truly!
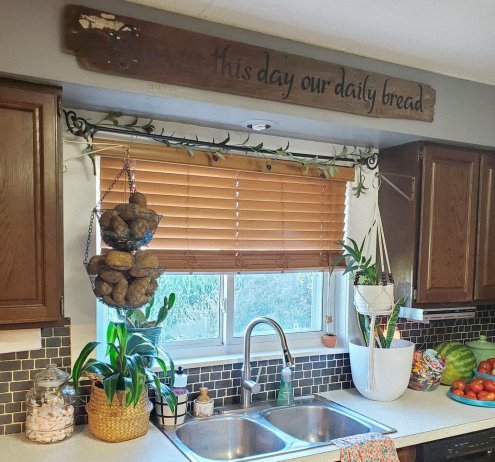
Here’s a quick breakdown of my latest project, a sign for our kitchen.

Choose a board and a quote. My board is a faded, chipped, barn board from our barn. (I’m sure to some the white paint left on one corner and the odd shape caused by years of cattle wear are not pretty, but we loved this board! 😉
Then, start on the Design Space app, and find my design template here. My board is 5ft long, but you can edit the design to adjust measurements. Once you send the design to the machine and it cuts it on vinyl, weed the excess pieces out. Use transfer tape to pick up your design and stick it down in place on your board. You could add flourishes to the ends of your quote too! You can change this design and even choose your own color vinyl. I used matte clear coat over the board to ensure no edges lift since I chose an old, rippled barn board for my project. Add a hanger or two on the back and hang. Easy peasy and a great one-of-a-kind, beginner-friendly project!

Have questions? Need help or ideas? Just ask! 😘
XX,
Jess
Quarantine Ideas
We remind the kids every day that we are “safe at home”, not “stuck at home”. And truly, we are blessed. But, sometimes it can be a little overwhelming having everyone here full time. I want to keep them all entertained, educated, occupied, happy…
Here are just a few ideas that may help during this time!
1. Follow my craft idea board on Pinterest! I add ideas to it as I see them, so check it out for some of the things we have tried and some we still hope to try!
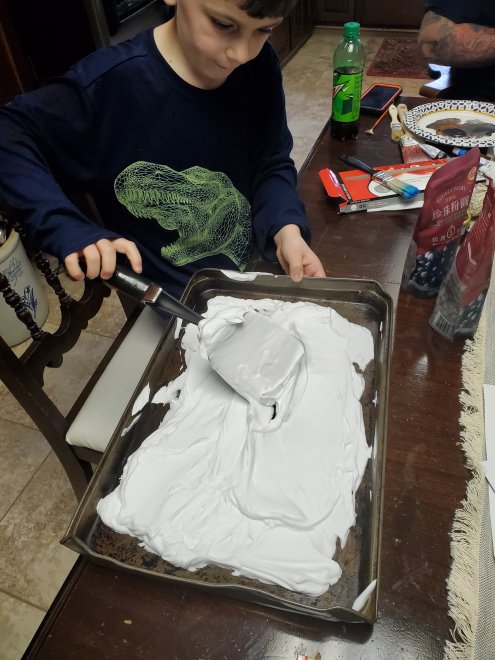
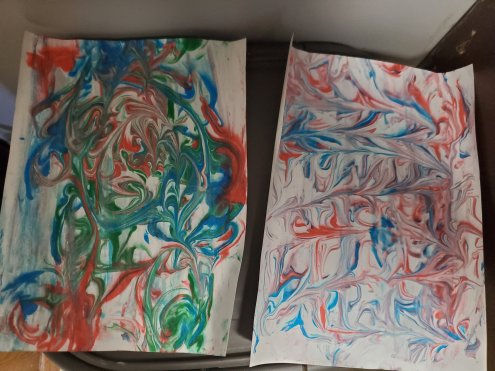
We have loved some of these! One true favorite was shaving cream art! Smear down shaving cream in a pan, add drops of food coloring and swirl them in any pattern with the end of a paintbrush. Lay a thick piece of paper on the colored cream and press. Lift up and scrape cream off the paper with a spatula. Look what it leaves behind!

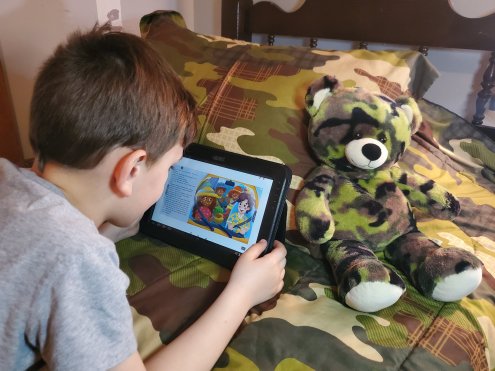
2. Educational apps that make learning fun! I know we all try to limit screen time. But we all need a break and a little help too! There are several we love, but one that the 6 year old can use by himself is Book Prunelle. It’s an ebook platform for kids , featuring powerful stories to inspire them to become the next generation of conscious kids. They tackle challenging topics in an entertaining and child-friendly way to help kids grown mindful and kind-hearted. Cool, right?!
You pay for a subscription by month or year, but right now you can try the first month for free! And you can use the code JESSIMARIEL5 off of either subscription too!
They have books like this one explaining the Corona Virus in terms kids understand!

3. Read with Dolly on Thursdays! The boys both loved this for some reason! Dolly Parton reads a story live on YouTube every Thursday and saves it to her channel to watch anytime. The boys were glued. And mom cleaned the kitchen! 😉
4. Duo appto facetime anyone. Maybe you knew about this? I did not, but was so happy to learn! With this app, any type of phone can video call one another. Now the kids can video call with grandma and grandpa!
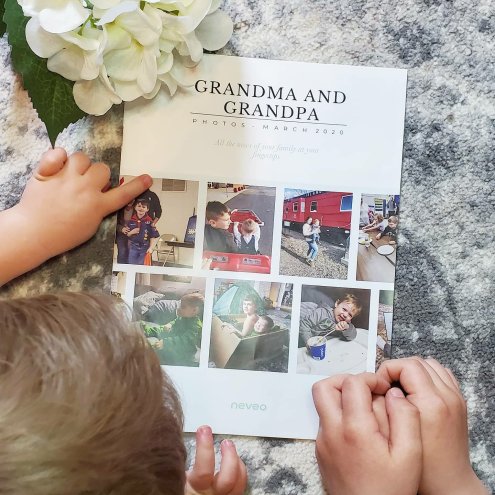
5. Neveo journal making! Neveo lets you add photos all month to an app and at the end of the month they put together your pictures and captions into a journal to be send to grandparents, friends, etc. So helpful for keeping up with some of those seniors that can’t get out right now! Use the code SUPPORT for two free months of 50 photo journals!
I hope these little ideas help even a tad bit. Hang in there. Give yourself grace. We’ve got this.
XX,
Jess
Permalink Comments Off on Quarantine Ideas
Mason Chair
Tony knows me well. The other day he sent me a message and said he had a surprise for me that I was really going to love. Aw. Yup, he was right. He pulled in the driveway with a chair in the back of his truck! Tony is in the Masonic Lodge and they are updating and selling off some of their old chairs. So, he nabbed one. He picked the oldest (see, he does know me well!). It even has straps underneath holding old straw stuffing in!


The leather seat is in bad shape, so we plan to refurbish it. I would love to find some old, worn looking leather for the replacement (if you know where I can accomplish this please let me know!). We would really like to keep the nostalgia of the chair, so are trying to keep it similar to its original look. Currently Tony has set up camp for the new chair at the head of the table 🙂

Now, where to find pre-worn leather pieces!??
Some Gardening
Last night I picked up a few inexpensive black, square pots for a few flowers for our porch. I think they (although small) brightened up the front porch and made it at least look like someone lives there! We also hung a strawberry plant in the corner, where it can get a lot of sun. (Again, sorry for the dark, rainy pictures!)


It’s at least a start. So, while I was out there I started pulling a few “weeds” from the rocks around the porch. By the way, I am puzzled as to why the last owner planted three big, beautiful, green plants on one side of the steps, but none on the other. So, if you are wondering, don’t ask me! So, as I was pulling this “weed” from between all of the rocks (it looked like misplaced grass) I noticed it was growing from bulbs! Grass doesn’t grow from bulbs, does it? We are curious as to what it is, and maybe whether or not we should be pulling it!? Here is a picture of what I pulled up, so if you have any info I’m all ears!

Let me know what you think! And, just for run, here is a picture of the pretty yellow flowers growing in the back yard!

More Curtains!
Last night we finished hanging curtains in the living room. I am so excited to not have these flowery old lady curtains any more:

 I really wish I would have remembered to take specific before shots of these. They even had poufy, paper-stuffed valences!
I’m not too sure about the new curtains we chose, so I need your opinions and suggestions. They are, no doubt, better than the before, but not exactly what we had in mind. We wanted to stay inexpensive for right now, so we got these at WalMart (no Ikea near us!). We originally picked a charcoal color, but when we got home we realized that the packages we grabbed were all black! They do need some steaming, but here they are:


I think it is a huge improvement, but it still feels a little off. Tony likes the blinds on one window (this is the previous family’s doing- not mine!) but, I think the small window should have sheers as well so the two match. What do you think?
Either way, these are much more our taste, style, and colors, and best of all- no foofy grandma curtains! 🙂
Oh, and I realize that we really need a rod that is meant to be showing, but we aren’t going to spend the money on a custom length one right now. So, the white bar has to stay and we just have to deal with it for a little while!
My Office and Easy Tips
We did do work at home over the weekend, really. But, the snow on Sunday (snow!?) hindered us from accomplishing too much. I will have a few things to show you later on in the week, but for today I am going to show you my work office.
When I started at this job one of the first I thought about was how to dress up my first personal office. I wanted to create a fun and unique work space without spending a bunch of money. Of course I was not about to go out and buy new furniture, but I do have a few simple and very cheap ideas for dressing up the drab office. Although you may not be able to produce your dream office with a space that you don’t own, you can make it a comfortable and productive space!
1. Posters. Not the priciest artwork, but good enough for a work office. I hung the Keep Calm poster as you enter my doorway (Yup, cliche maybe, but I still love it!). I also hung an inspirational quote from Muhammad Ali on the opposite wall. These were so fitting as I work in a hospital as a medical case manager. And, they give me some color, but stay in the basics I love!


2. Use your printer. I made these blah magnets cute by printing a sheet of white paper with a paisley pattern. I cut the sheets down to the size of the magnets and glued them on. I then covered them with clear plastic tape. I also used paper to fill the letter opener magnet. The other side of the desk is a sheet of paper I printed with the Chinese symbol for “happiness.” I have a few printed quotes around the office as well. These are cheap enough to switch out once in a while too!


3. Paper flowers. I wanted to add some brightness to my office, but am horrible at caring for plants. So, I made paper roses with tissue paper. I stuck them in a thrift store vase and now have flowers all year round. (the candy is a crowd pleaser as well)

4. Organization! Staying organized is the simplest, cheapest way to keep an office space looking its best. I have some open shelves that I make sure are always orderly. This is also a good time saver. I always know where things are and never have to hunt!

5. Personal but professional. A nice touch to an office space is something personal. But, remember to keep it professional. Too many pictures or tchochkes can make an office space cluttered and unprofessional. I have some pictures hung and framed in my office, but only ones that I don’t mind if clients see. I have a magic 8 ball on my desk for those real tough decisions as well ;). My desk top is also an example of keeping organized. And, the calendar is a free printable version from calendarsthatwork.com. I love these, as they look cute and are simple instead of busy! Also notice my mouse pad and pen. Little touches that were inexpensive!

Hope these simple ideas help you with your office. Mine is just like my home, always changing. Enjoy!
Mini Bar Update
We have had the old TV armoire we found on Craigslist home for a couple of weeks now. I haven’t posted about it because we are having a change of heart. We had wanted to strip the wood and stain it black. But, when we got the cabinet home we thought it was so gorgeous we couldn’t bear to do that! I thought that going black and adding some shiny handles and mirrors would add some Hollywood Regency to the cabinet, more suiting it to become a mini bar. I just don’t know if we can bring ourselves to touch the beautiful wood. We did add a stemware rack to the top and filled it with our lovely bar glasses and goods. It is really gorgeous in our dining room, and it has already served it’s purpose. We do still plan on adding another shelf in glass and also a pull out shelf for more mixing and pouring space.
What do you think? Should we restain the cabinet black or leave it as it is?


You can't see it here because there is no stemware in it, but there is a clear stemware rack on the right side.
We really do need your advice, opinions and ideas!!
The Start Of A New Project
The other day I wrote about how we wanted to make a mini bar area in our home. I showed pictures of other people’s re-purposed bar areas that we loved. But, after much discussion we decided we liked the look of a closed cabinet for this kind of thing a little better. With all of my inspiration in hand, I set out to plan my own mini bar project. Yes, we found the perfect (we hope!) cabinet for the job! A Craigslist post led us to the Maple TV Cabinet.

I see much potential in the armoire! (We don’t actually pick it up until Thursday.) I plan on first painting it a high gloss black. The back inside of the cabinet with be lined with mirror and wine and stemware racks will be hung from the inside. The inside has one shelf, but we are guessing we will make a few new shelves from glass. I am going for a bit of Hollywood regency here. Overall, we think this beauty should have plenty of space for our entertainment needs!
We do have one small question, however. I think there needs to be a flat space large enough to mix the actual drinks incorporated into the cabinet somehow. I was wondering if the drawer could be used for that. It might be a bit too low to be comfortable, though. I was also wondering about making a sort of pull-out shelf inside the cabinet. Is this even possible? When I see the cabinet in person I will know if more space is necessary. Until then, does anyone have any ideas or suggestions?
We are very excited to get the project rolling, so stay tuned for updates!
Cube Redo
I have had this little storage cube since I was a kid. When new, it had a unicorn and a rainbow on it. Recently I redid the look of the cube so that it could be used in our home. I forgot all about the cube project until yesterday. There was a question posed on Apartment Therapy about recommendations for redoing a similar cube. I thought that I would let you all know how I did the project, and although I do not have any before or durring pictures, I can show you how it turned out. Here was the process:
1. I started by covering the picture areas of the cube with white contact paper. I was lucky that the sides were the same width as the paper, but I did run short of paper at the top and had to piece two pieces together. For a bigger box this is what you would have to do. Not to worry, the seem barely shows once you get the paint on the paper. Just try to line them up as exactly as possible.
2. Once the paper was on, I used an Exact-O knife to cut the contact paper around any hardware or latches. This worked well and really didn’t cause any problems as long as you work slowly and patiently.
3. After the paper was laid and cut, I painted it. I picked a dark red, and simply used wall paint from the hardware store and applied with a regular brush. I recommend this, as it was easy and inexpensive. I personally wanted an antiqued look to go with the worn metal hardware, so I only applied one coat and left it a bit streaky. If you want a smooth, more flawless finish, I think two coats would do the trick just fine.
4. To add a personal touch I used a foam stamp. I found this stamp at the hardware store on sale for about 50 cents. While the paint was still wet I pressed the dry stamp into it in a pattern I liked. When you raise the stamp it takes some of the paint off, leaving a lighter area for the design. I used a circular design that went with the antiqued look.
Viola! Finished! It really was that simple. Now this cube serves as storage for blankets in our living room. And, this has stood up to some use and abuse and even relocating a few times. It has a few small scratches in it now, but that seems to add to it’s antiqued character. If you want yours to stay looking new try using a protective clear coat on top. Here’s what ours looks like:


Some foam stamps similar to mine can be find at http://www.makingmemories.com and other scrap-booking websites.

Have fun!
A New Addition
Well, it has been a busy weekend around our house. Nope, no house projects, no scrap-booking, no treasure hunting. We got a puppy! Yes, we picked out a new little puppy Saturday night. It has been crazy at our house ever since. The dogs seem to get along, but are wild right now. So, I thought I would show you a picture of our cute little girl. She’s 9 weeks old, and she’s a Boxer/Rottweiler mix. I think she is going to be huge! We are considering naming her Wrigley, but let me know if you have any other ideas!


Does she look like a Wrigley? And, did you see all those wrinkles she has to grow into? And the size of those paws!?

P.S. We are still undecided on a name, but have narrowed it to Wrigley, Marley or Ridley, so let me know what you think!
