Typewriter Table Detailed
Sorry, I forgot to upload new pictures yesterday. But, today you get to see a lot of progress from the weekend! Here is the typewriter table that I showed you before. It is now finished and detailed!


Once I finished the second coat of white spray paint I arranged cardboard scrap-booking stencils in the placement I liked. I traced and filled the stencils with a paint pen. These little guys work great! I have used it on a couple of projects now and it always does the trick. I think it is super cute and ready to be used!
Thrifted and Rearranged
We have been busy busy. It all started with a quick stop at the D.A.V. (Disabled American Veteran’s) thrift store. I happened upon a cute little vintage typewriter table for $3.95! I love the metal industrial look, so I couldn’t resist. It was just a bit dirty and scratched, so we painted her white. With one more coat and a small black swirl on top (this weekend) this beauty will sit next to the door to the backyard in the dining room. It is on wheels and easily movable, so it will serve as an outdoor drink table as well. We have been searching for something to go outdoors while enjoying grilling or the bonfire, and nothing seems pretty but built for the outdoors. This way we can just bring the little table in when we aren’t out there. Here she is:


While I was there I also spotted an antique, claw foot, drop leaf table. Hmmm… We got to thinking. We have been wanting a bigger table for the dining room and decided to try moving the red table to the kitchen. After giving the rooms some rearranging we fell in love. Here’s the kitchen:


It feels so nice and cozy in there now. We even sat here yesterday morning and had coffee together. So, after giving the new arrangement a night we decided it was a keeper. I headed back to the D.A.V. and snatched up the dining table. We got a great deal, but it does need some work. I removed some scuffs, but there are scratches. We are probably going to cover it with a table cloth until we get some other projects finished and then start stripping and refinishing it. We are thinking of staining it either a lighter brown to match the maple bar or black like the desk that is still in progress. I am still hung up on my mis-matched chairs, and am in the process of adding a few different styled ones, so although it doesn’t match perfectly right now it will when we get done! Bonus: I found out that the table expands for adding leaves! Although it didn’t have the originals with it we can make some for it to have big family meals here! 🙂 Here’s the dining room:


Well, what do you think? Any suggestions or ideas? Its always a work in progress, but it’s getting there! Oh, and Romeo the camera hog says hi, too.
My Office and Easy Tips
We did do work at home over the weekend, really. But, the snow on Sunday (snow!?) hindered us from accomplishing too much. I will have a few things to show you later on in the week, but for today I am going to show you my work office.
When I started at this job one of the first I thought about was how to dress up my first personal office. I wanted to create a fun and unique work space without spending a bunch of money. Of course I was not about to go out and buy new furniture, but I do have a few simple and very cheap ideas for dressing up the drab office. Although you may not be able to produce your dream office with a space that you don’t own, you can make it a comfortable and productive space!
1. Posters. Not the priciest artwork, but good enough for a work office. I hung the Keep Calm poster as you enter my doorway (Yup, cliche maybe, but I still love it!). I also hung an inspirational quote from Muhammad Ali on the opposite wall. These were so fitting as I work in a hospital as a medical case manager. And, they give me some color, but stay in the basics I love!


2. Use your printer. I made these blah magnets cute by printing a sheet of white paper with a paisley pattern. I cut the sheets down to the size of the magnets and glued them on. I then covered them with clear plastic tape. I also used paper to fill the letter opener magnet. The other side of the desk is a sheet of paper I printed with the Chinese symbol for “happiness.” I have a few printed quotes around the office as well. These are cheap enough to switch out once in a while too!


3. Paper flowers. I wanted to add some brightness to my office, but am horrible at caring for plants. So, I made paper roses with tissue paper. I stuck them in a thrift store vase and now have flowers all year round. (the candy is a crowd pleaser as well)

4. Organization! Staying organized is the simplest, cheapest way to keep an office space looking its best. I have some open shelves that I make sure are always orderly. This is also a good time saver. I always know where things are and never have to hunt!

5. Personal but professional. A nice touch to an office space is something personal. But, remember to keep it professional. Too many pictures or tchochkes can make an office space cluttered and unprofessional. I have some pictures hung and framed in my office, but only ones that I don’t mind if clients see. I have a magic 8 ball on my desk for those real tough decisions as well ;). My desk top is also an example of keeping organized. And, the calendar is a free printable version from calendarsthatwork.com. I love these, as they look cute and are simple instead of busy! Also notice my mouse pad and pen. Little touches that were inexpensive!

Hope these simple ideas help you with your office. Mine is just like my home, always changing. Enjoy!
Chair Love Again
This week I have been slow. But, it just hit me. My daily Apartment Therapy email just came in, and there is was, this amazing industial looking chair. I do not know much about the chair itself, but Atelier 154 in France is the shop where this baby can be found, and the stylists of this blog that contains manygorgeous photos other photos are Elodie and Karine Kong. See them here: http://bodieandfou.blogspot.com .

Just simply beautiful.
P.S. I think that my weekly chair loves are so random and different because they tend to match my mood for that week (or day). I just noticed that as this chair even kind of matches the outfit I am wearing today. Casual, but classic, but also unique. Anyways…
New Chair Love
This week I found this cute little Mid Century chair on Flickr.


This is a walnut and naugahyde rocker and ottoman. I’m not usually super into MCM furniture, but I can totally see this rocker being used in a living room or nursery for a new baby. The white leather look with the dark wood is great.
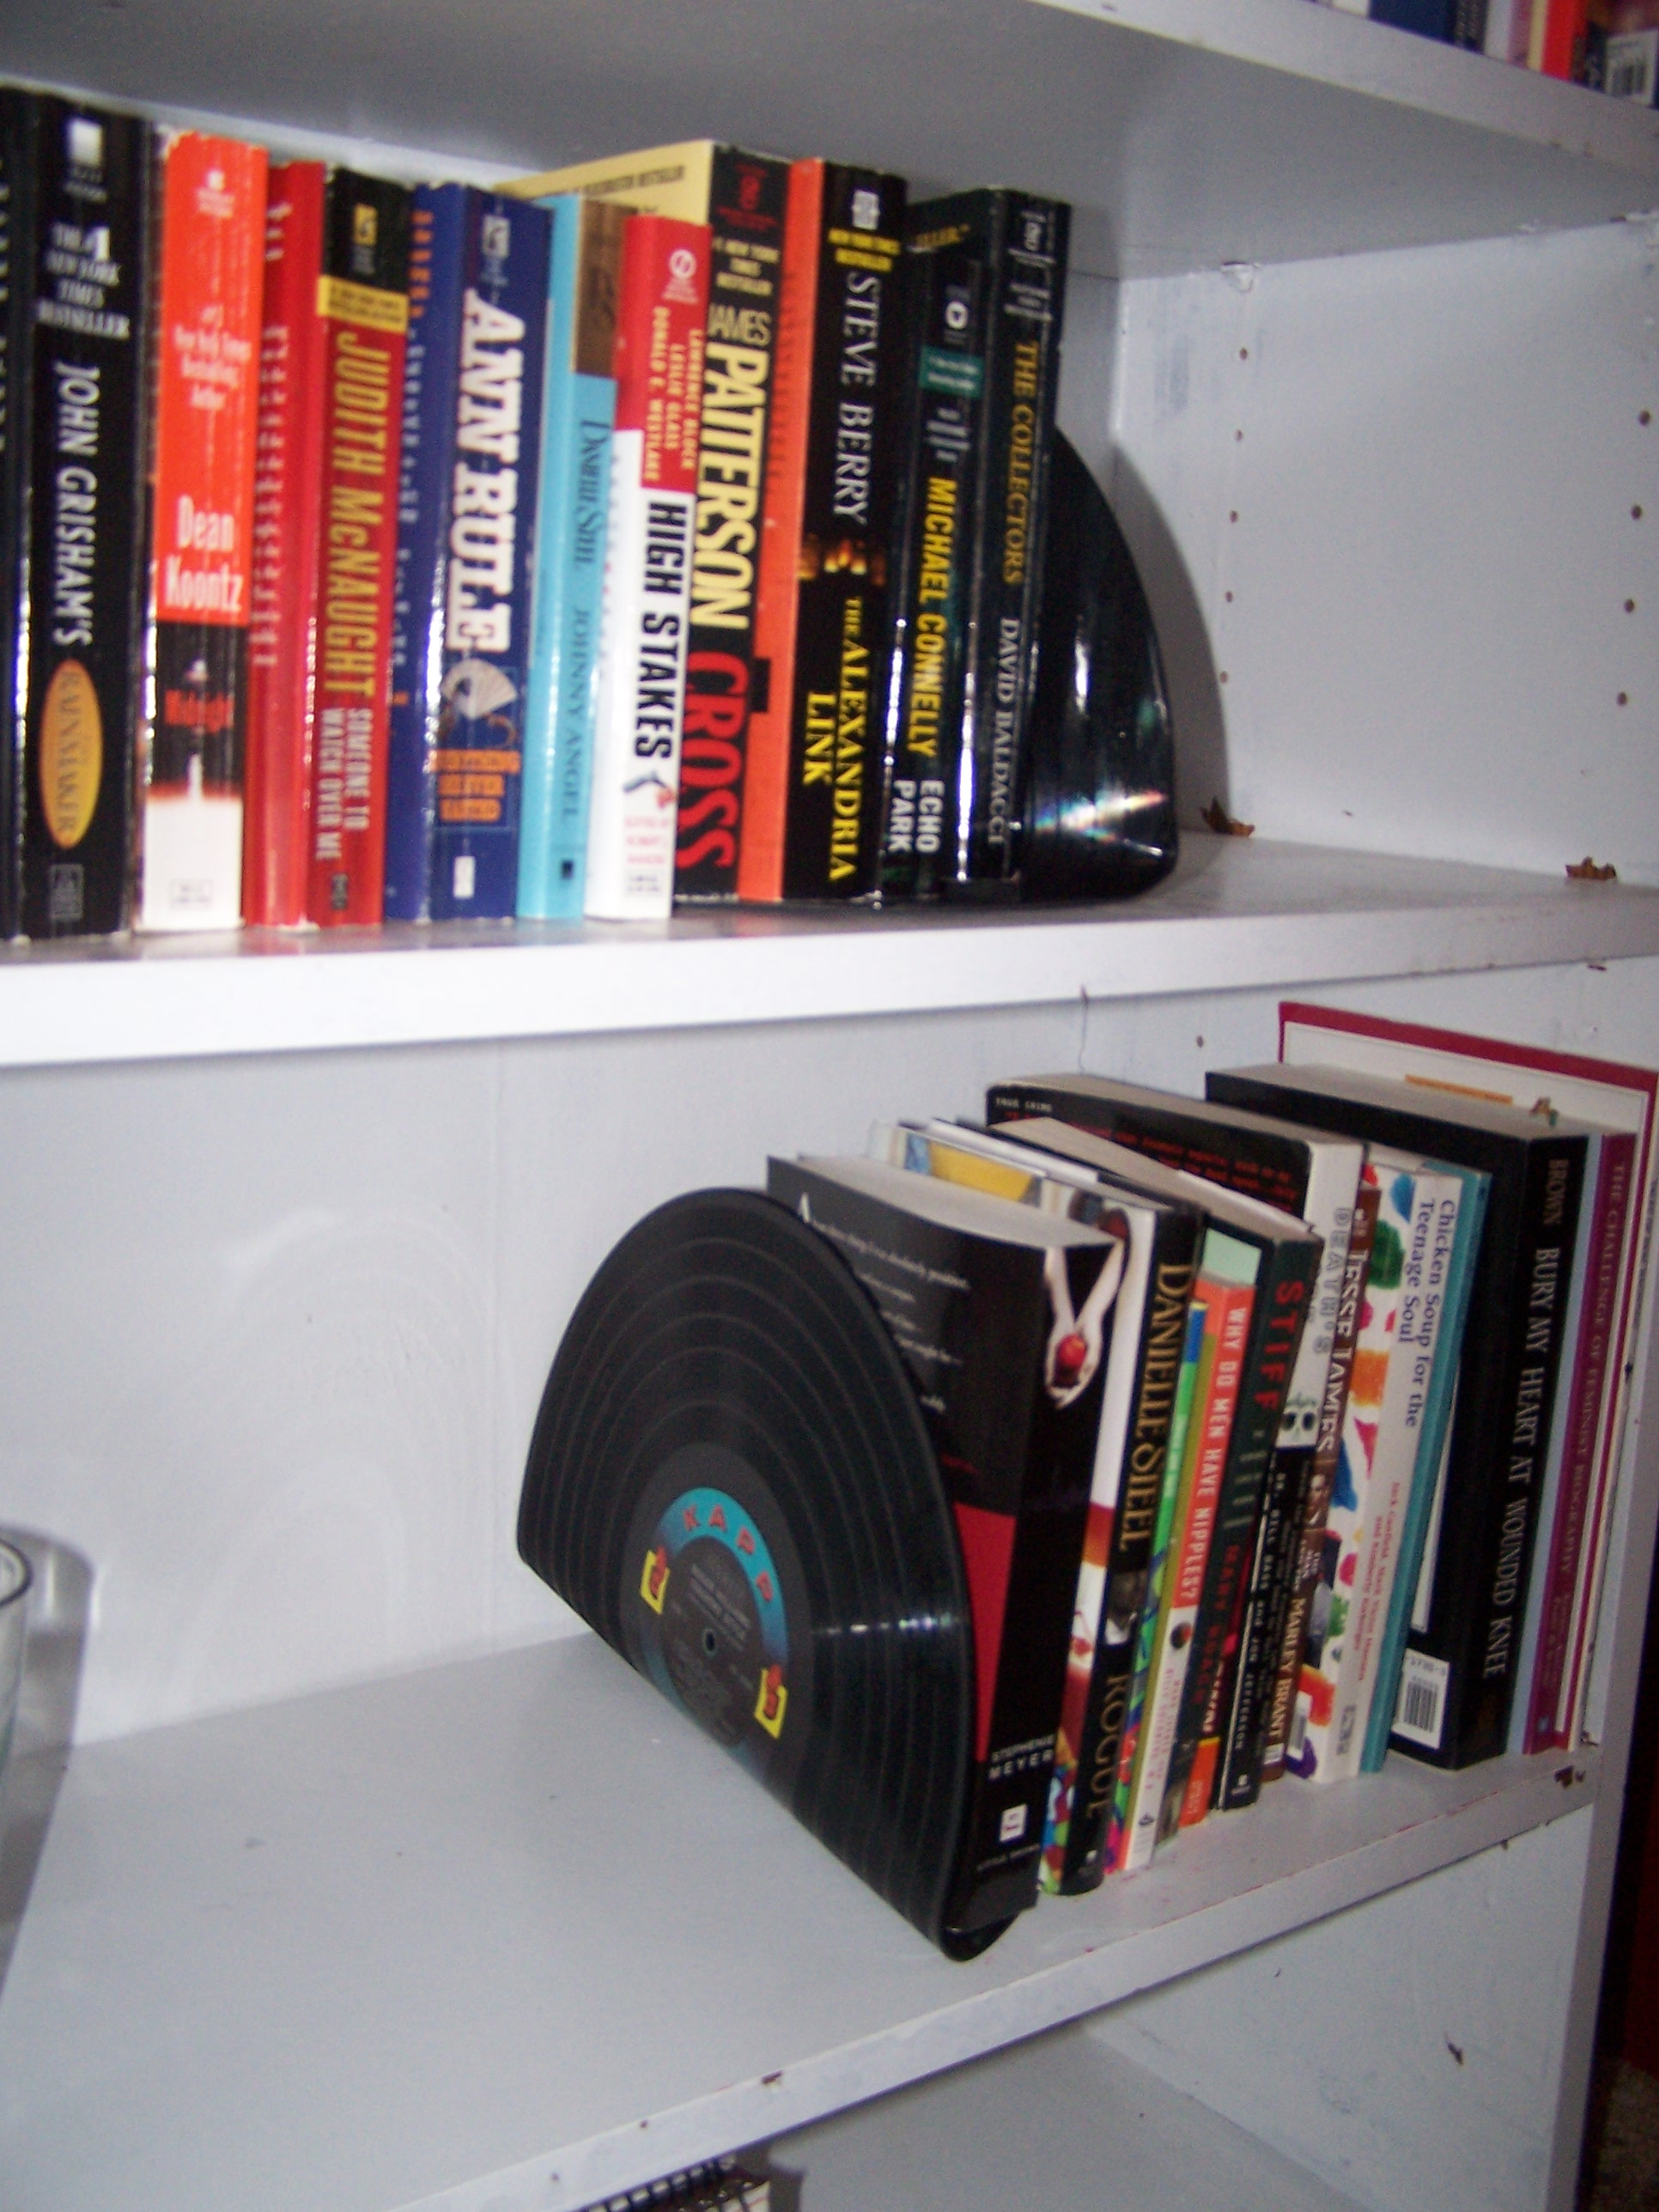
Bookend Project
I have said it before, but I love repurposing items. Especially in these times, finding new life for old items is the greenest option. Some things you hate to ruin by transforming them, but for the most part I believe that reusing old or obsolete items is a far better choice than letting them waste away in some one’s unloving basement, or worse yet, a landfill. Plus, repurposing is often much cheaper than buying new items, as well as healthier for the planet. So, when I get the chance to make a new addition to our home, and at the same time get a new project with old items, I jump on it!
In college I made bowls out of records as a dorm floor project. I still have mine in our office on the book shelf. The other day I saw a project online where book ends were being made out of old records, and decided that would be a perfect addition to the shelves, and even fit in with our music themed office.
I made a stop yesterday at the Salvation Army and picked up two records. They weren’t anything special, just old records in decent shape and with pretty labels. Last night we boiled some water and dumped it in the kitchen sink. The water softens the record and you use a utensil to bend it.
Overall the project was easy and turned out pretty cute!


Cooling off under a box.

Bench Project
When we first moved into our new house Tony and I bought a vintage vanity on Craigslist for $20 to go in our spare bedroom. The vanity is used to hold all of my “get ready in the morning stuff”. The vanity came with a little vanity bench. The problem was that the bench didn’t match the vanity. The bench was painted white and had obviously been recovered with some purple material. I had thought about painting the vanity a shabby white, but that wouldn’t solve the whole problem. The styles and sizes of the vanity and the bench didn’t even match. So, I put the bench up for sale on Craigslist, again. After a couple of weeks the bench still hadn’t sold. Well, another project for me!
I liked the chipped white paint of the bench, so I decided to keep it. I also decided that there were too many things, including another, smaller vintage vanity seat already in the spare bedroom. I thought that the front porch could use something, so that was to be the new home of the bench. We have a small, white ice cream table and two chairs on the porch, but nothing else so far. The white would be a perfect match. I have also had my eyes peeled for some of those vintage metal lawn chairs. I want two of them in red, or to paint red. That helped me make my choice for fabric. I chose a white material with a red coral pattern.
Last night I started ripping old fabric off the bench. Come to find out there was not only one layer of awful fabric, but three! Here’s the before photo:

The next layer. Even worse:

And the final dingy layer:

But, here’s what it looks like all spruced up:


I think its really cute now. I will show you pictures of what it looks like on the porch once I get the ice cream set repainted!
A Pop Of Red
The black and white kitchen gets a pop of color! Red! While at the Salvation Army looking for items for a few projects, I came across the cutest little vintage sauce pan. And, it was red. I couldn’t resist. Now it hangs on the wall in our kitchen. So cute.

The pot wouldn’t hang the other way around, but it worked out ok. The bottom of the pan is decorated! It says Vitrex Gourmet and has some funky designs. With some research I learned that Vitrex Gourmet is a Spanish cookware company. Very cute, and very durable, too!


The little things truly do amuse me!
Mini Bar Update
We have had the old TV armoire we found on Craigslist home for a couple of weeks now. I haven’t posted about it because we are having a change of heart. We had wanted to strip the wood and stain it black. But, when we got the cabinet home we thought it was so gorgeous we couldn’t bear to do that! I thought that going black and adding some shiny handles and mirrors would add some Hollywood Regency to the cabinet, more suiting it to become a mini bar. I just don’t know if we can bring ourselves to touch the beautiful wood. We did add a stemware rack to the top and filled it with our lovely bar glasses and goods. It is really gorgeous in our dining room, and it has already served it’s purpose. We do still plan on adding another shelf in glass and also a pull out shelf for more mixing and pouring space.
What do you think? Should we restain the cabinet black or leave it as it is?


You can't see it here because there is no stemware in it, but there is a clear stemware rack on the right side.
We really do need your advice, opinions and ideas!!
Tidying Up
I’m a neat freak. I know it. I’m actually proud of it. I like that my home is always clean, neat, and organized. I feel that everything should have a place. Junk left out of it’s place clutters up your house and really ruins the appearance. I love ugly necessities (like cleaning supplies or utensils) to have a place to be stashed that is concealed when not in use. Not only does this just look so much better, but it also means you will not lose things or forget where you left them. Our cleaning supplies are under the kitchen sink in tubs. We always keep a flashlight right under the sink as well. A few basic tools and utensils that are needed frequently are in a drawer in the kitchen island, and the rest of the tools are in the tool box in the basement. I could tell you where ever item I own is right now. This drives Tony nuts that he has to put everything back in it’s assigned spot, but he will be thanking me in an emergency when I find what we need in seconds!
Anyway, this brings me to the topic at hand. Our mops and brooms. They are too big to fit under the sink, but too ugly to be left leaning against a wall in the kitchen. I had them stashed away in the basement. But, no one wanted to go down there to get them every time there was a mess. I even caught myself on hands and knees wiping up the floor with a paper towel instead of heading to the basement. I knew there had to be a better solution.
We took a trip this weekend to our local hardware store and found a basic hook set. My plan was to hang this strip of hooks inside the basement door for easy access to brooms and mops. The strip was a bit too long to fit from one beam to another along the unfinished basement walls. We compromised and leaned the strip of hooks on it’s side. It actually worked out perfectly, and the long handled tools hang perfectly just inside the door. I’m pleased. 🙂 And, now we can save paper towels and make our lazy selves go grab the mop!

The brooms and mops hanging so nicely just inside our basement door.

The row of hooks that proved to be a simple and inexpensive solution to a daily annoyance.
We were so inspired we even added a couple single hooks to the opposite wall for hanging dog toys and leashes.

These things will no longer have to be draped sloppily over the banister!
Simple fixes make all the difference in a home!
